> ## Documentation Index
> Fetch the complete documentation index at: https://java.agentscope.io/llms.txt
> Use this file to discover all available pages before exploring further.
# Visual Console
> Configure Agents, run Sessions, and manage work visually, sharing platform resources and execution records with the API.
Console and the API are two ways to use AgentScope Service. Console lets you configure Agents, submit work, observe execution, and handle decisions in your browser; the API lets applications and scripts perform corresponding operations. They share platform resources and permission rules, so applications can call an Agent created in Console, and Console can manage an Agent created through the management API.
You can use the platform entirely through Console or combine it with an application. For example, adjust instructions and tools in the interface, verify behavior with a real execution, then let your application call the same Agent. After integration, your team can continue managing configuration, following related work, and reviewing delivery in Console. Both interfaces can be used independently or alternated as the work requires.
Before your first visit, [deploy Service](/v2/en/service/quickstart) and obtain the Console address and an account. After signing in, confirm your current Namespace: Agents, resources, and work records belong to that scope, and your permissions determine what you can view or change. This guide starts with configuring and running a Managed Agent, then covers application integration and business collaboration.
## Create and configure an Agent
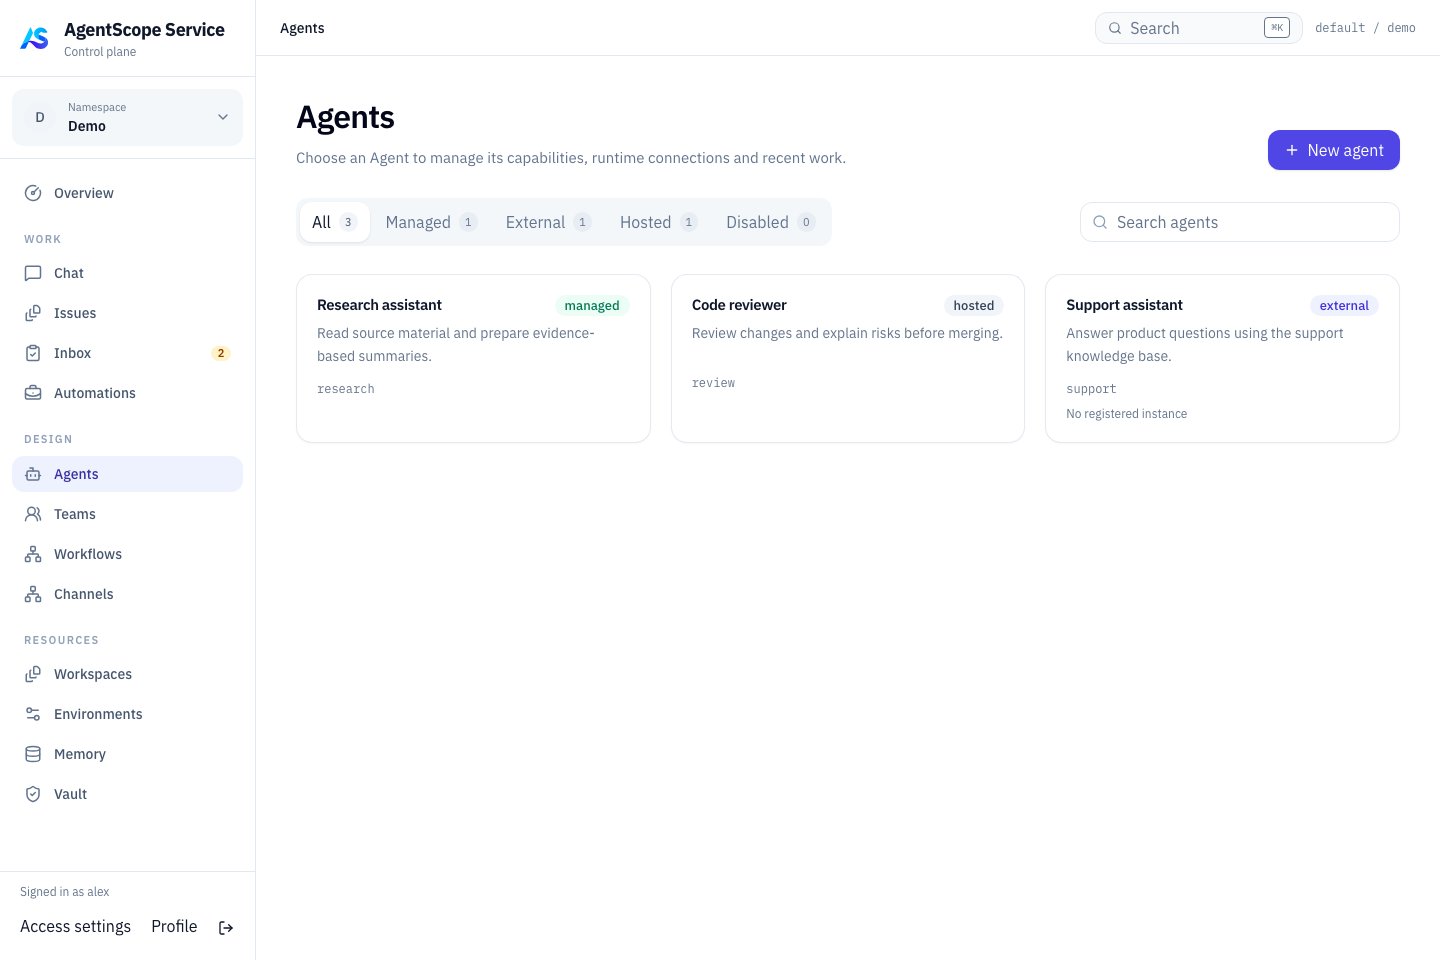
Open **Design → Agents → New agent**, provide a name and purpose, and use **Instructions** to describe the work, the evidence the Agent should use, and the expected delivery. For your first Agent, select **AgentScope Managed** as **Runtime**. Service runs the Managed Agent on the HarnessAgent kernel. Leave **Model** empty to use the deployment default, or specify a model override.
Check **Agent key** in **Advanced settings** and retain a stable business identifier, such as `notes-assistant`. Confirm the runtime and select **Create & open agent**. You can subsequently adjust behavior and the model in **Definition → Behavior** without creating another Agent.
 If the Agent needs files or business systems, select tools in **Definition → Tools & MCP**, using **Ask** for operations that need confirmation. Configure MCP connections here as well, saving server connections and the rules that enable their tools. These settings belong to this Agent's definition and are used by subsequent Sessions that reference it. See [Tools, MCP, and permissions](/v2/en/service/tools) for declarations, filtering, and permission policies.
To reuse shared instructions, Skills, or Subagents, prepare content under **Resources → Workspaces**, then select the Workspace and its revision in this Agent's **Definition → Workspace**. After saving the binding, check which settings are inherited and which the Agent overrides. Creating a Workspace in the resource catalog alone does not make the Agent use it. **Definition → Skills** and **Subagents** let you inspect or adjust those capabilities. See [Workspaces, Skills, and Subagents](/v2/en/service/workspaces) for binding and revision rules.
Bind execution resources under **Runtime configuration**. Selecting a default Environment establishes the tool execution location for new Sessions; selecting Memory and Vault resources makes shared knowledge and tool credentials available according to their configuration. Prepare these resources under **Resources**, then associate them with the Agent. Their existence alone does not establish access. See [Agent configuration](/v2/en/service/managed-agent-configuration), [Environments](/v2/en/service/environments), [Memory](/v2/en/service/memory), and [Vaults](/v2/en/service/vault) for configuration and scope.
For an existing application, [register an External Agent](/v2/en/service/register-agentscope-agent) and integrate its runtime before inspecting bindings and instances in the Agents catalog. For an existing Coding Agent, [connect Runtime Host](/v2/en/service/connect-hosted-agent), then select the discovered Hosted provider in the creation form. These Agents can receive work and collaborate through Console, but their tools and controls depend on actual runtime capabilities. Verify each with a small task first.
## Run a Session in Console
Open **Connections → Session API** in the Agent detail page and enter a **Task message**. For your first test, leave **Application API key** empty to use your signed-in identity. Selecting **Create Session and submit** creates a Session referencing the Agent and submits the input as a Turn. This is real background execution using the configured model, tools, and environment.
The page displays the Session ID, Turn ID, and execution status, and updates messages and **Tool activity**. A `queued` status means the work was received and is still waiting; wait for that Turn to finish before assessing completion. Inspect tool inputs and results to confirm that the Agent accessed the material and performed the operations supporting its final answer. When artifact records are available, download files and check the delivery. See [Files and artifacts](/v2/en/service/files) for access details.
If execution needs more information or a decision about an operation, read the request under **Required actions** and submit the appropriate response. An approval assigned to a specific person requires that person's signed-in identity; an application credential does not automatically authorize decisions on their behalf. The interface offers additional input, cancellation, or resumption according to the target's capabilities. After submitting a control request, observe execution state to confirm that it took effect.
Use **Submit next Turn** to add work to the same Session. A Managed Agent retains conversation context there; choose **New Session** for independent work. Also create a new Session after changing the Agent definition or resource bindings, since an existing Session retains the configuration selected at creation. Refreshing the page restores the existing Session and Turn display without automatically resubmitting the task.
You can also clarify requirements through **Work → Chat → New chat**. The Session API panel in the Agent detail page is useful for checking execution behavior together with the application calling flow. In either interface, assess configuration against actual results.
## Share an Agent service with API clients
After configuration in Console, an application can create a Session using that Agent's platform ID, and Service executes work according to the saved definition. Conversely, an authorized user can manage Agents created or updated through the management API in the same Namespace's Console. The shared resource ID connects the interfaces, and subsequent configuration changes are saved in the same Agent definition.
Under **Connections → Session API → Application credentials**, select an existing Application or create one for your business application, choose the required scopes, and select **Issue key**. The credential grants the current execution target and the selected calling operations. Your backend can use it to create Sessions, submit tasks, and retrieve results; it is distinct from a user identity used to configure platform resources. A new key is shown only at creation, so save it to your backend before leaving the page.
Expand **API example** for Session creation and Turn submission requests targeting the current resource. Reuse that target ID to integrate the Agent you verified in Console. Save the returned Session and Turn IDs and use those records when reading progress, responding to actions, or restoring your application's interface. See [Integrate applications with the Session API](/v2/en/service/service-api) for the calling flow and the [API reference](/v2/en/service/api-reference#agents) for Agent definition management.
To verify the application's identity before integration, enter its Application API key before creating a Session and submit a task. This checks whether the granted target and operations support the actual call. Use the relevant APIs for bulk management, automated integration, or parameters not yet exposed in the interface. Console remains available for managing related resources and inspecting their associated work.
## Assign, follow, and review work
Sessions support task submission and continuing interaction. When business work also needs an assignee, discussion, and acceptance, open **Work → Issues → New issue**, describe the objective, delivery requirements, and acceptance criteria, then assign an Agent, Team, or person. You can also use **Create issue** in Chat, but check and complete the carried-over material before submission. A conversation source reference does not give collaborators access to the entire private conversation.
Follow discussion and delivery in the Issue, and use associated **Executions** to inspect member tasks, steps, and failures. Add requirements through comments and Mentions, then check whether routed work progresses. Resolve missing conditions when work is `Blocked`; evaluate results against acceptance criteria when it reaches `In review`. A successful execution alone does not establish business completion.
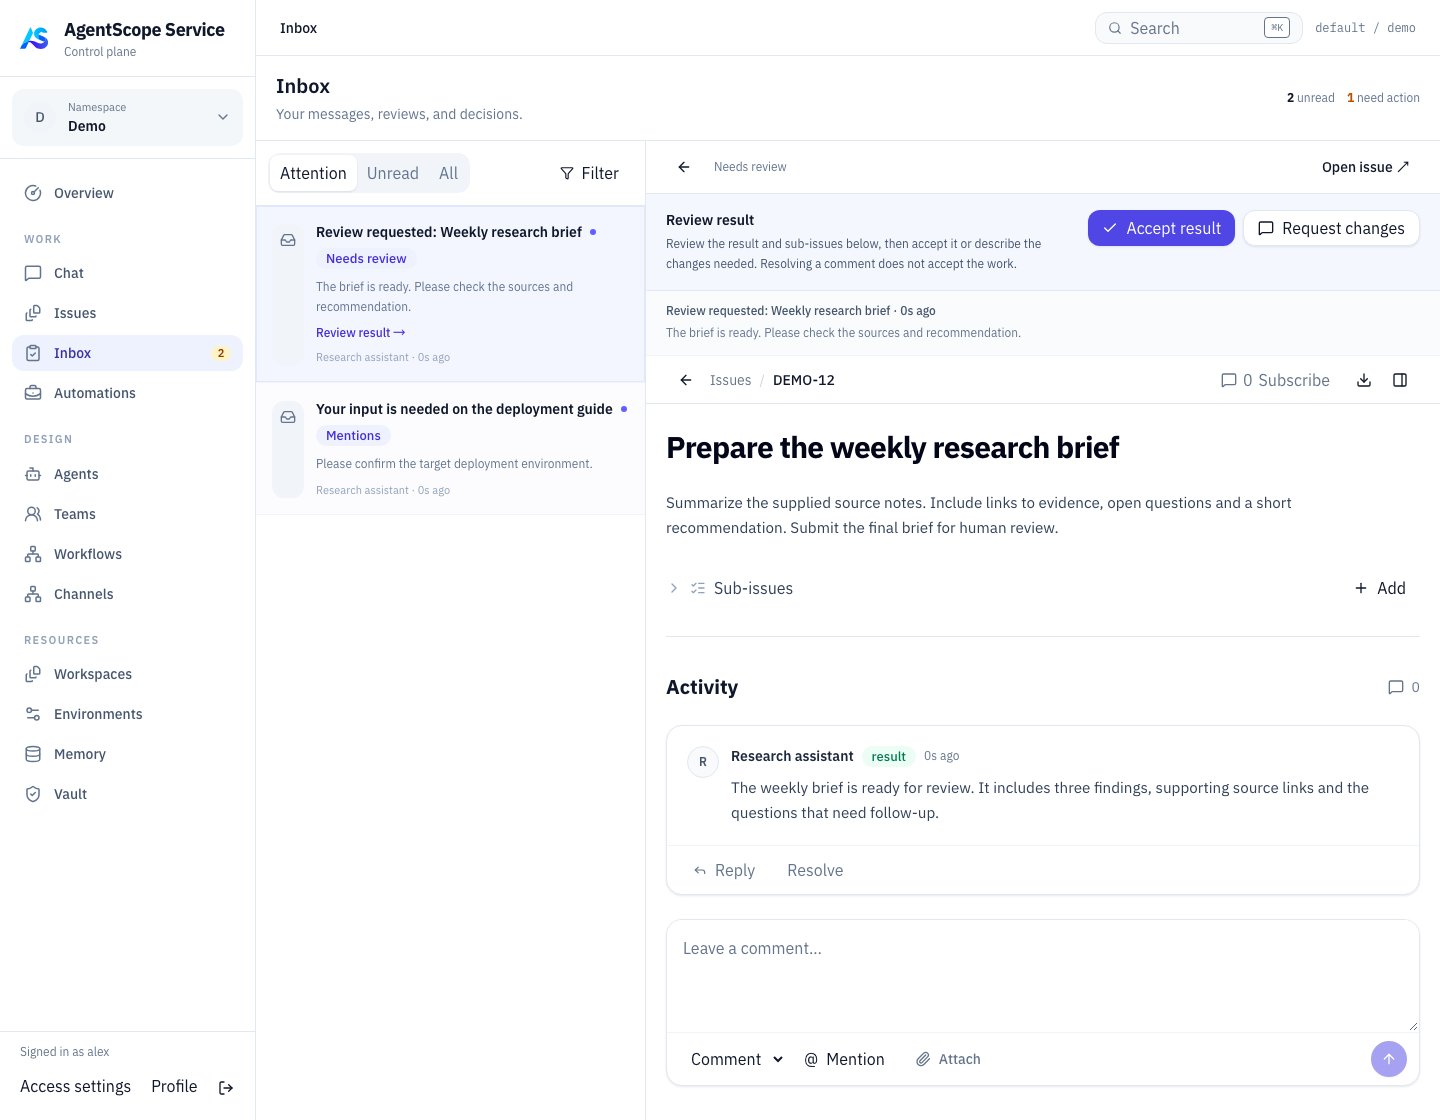
Open **Review result** under **Work → Inbox → Needs action**, inspect results, attachments, and related child work, then select **Accept result** or **Request changes** and submit the review. Returning work records feedback, but subsequent execution still needs follow-up. Operation approval and result acceptance are separate decisions: allowing a tool or process step does not accept its final delivery. Handle Session tool actions in the corresponding Session; not every request appears in Inbox. See [Work, approvals, and acceptance](/v2/en/service/issues) for states and API operations.
If the Agent needs files or business systems, select tools in **Definition → Tools & MCP**, using **Ask** for operations that need confirmation. Configure MCP connections here as well, saving server connections and the rules that enable their tools. These settings belong to this Agent's definition and are used by subsequent Sessions that reference it. See [Tools, MCP, and permissions](/v2/en/service/tools) for declarations, filtering, and permission policies.
To reuse shared instructions, Skills, or Subagents, prepare content under **Resources → Workspaces**, then select the Workspace and its revision in this Agent's **Definition → Workspace**. After saving the binding, check which settings are inherited and which the Agent overrides. Creating a Workspace in the resource catalog alone does not make the Agent use it. **Definition → Skills** and **Subagents** let you inspect or adjust those capabilities. See [Workspaces, Skills, and Subagents](/v2/en/service/workspaces) for binding and revision rules.
Bind execution resources under **Runtime configuration**. Selecting a default Environment establishes the tool execution location for new Sessions; selecting Memory and Vault resources makes shared knowledge and tool credentials available according to their configuration. Prepare these resources under **Resources**, then associate them with the Agent. Their existence alone does not establish access. See [Agent configuration](/v2/en/service/managed-agent-configuration), [Environments](/v2/en/service/environments), [Memory](/v2/en/service/memory), and [Vaults](/v2/en/service/vault) for configuration and scope.
For an existing application, [register an External Agent](/v2/en/service/register-agentscope-agent) and integrate its runtime before inspecting bindings and instances in the Agents catalog. For an existing Coding Agent, [connect Runtime Host](/v2/en/service/connect-hosted-agent), then select the discovered Hosted provider in the creation form. These Agents can receive work and collaborate through Console, but their tools and controls depend on actual runtime capabilities. Verify each with a small task first.
## Run a Session in Console
Open **Connections → Session API** in the Agent detail page and enter a **Task message**. For your first test, leave **Application API key** empty to use your signed-in identity. Selecting **Create Session and submit** creates a Session referencing the Agent and submits the input as a Turn. This is real background execution using the configured model, tools, and environment.
The page displays the Session ID, Turn ID, and execution status, and updates messages and **Tool activity**. A `queued` status means the work was received and is still waiting; wait for that Turn to finish before assessing completion. Inspect tool inputs and results to confirm that the Agent accessed the material and performed the operations supporting its final answer. When artifact records are available, download files and check the delivery. See [Files and artifacts](/v2/en/service/files) for access details.
If execution needs more information or a decision about an operation, read the request under **Required actions** and submit the appropriate response. An approval assigned to a specific person requires that person's signed-in identity; an application credential does not automatically authorize decisions on their behalf. The interface offers additional input, cancellation, or resumption according to the target's capabilities. After submitting a control request, observe execution state to confirm that it took effect.
Use **Submit next Turn** to add work to the same Session. A Managed Agent retains conversation context there; choose **New Session** for independent work. Also create a new Session after changing the Agent definition or resource bindings, since an existing Session retains the configuration selected at creation. Refreshing the page restores the existing Session and Turn display without automatically resubmitting the task.
You can also clarify requirements through **Work → Chat → New chat**. The Session API panel in the Agent detail page is useful for checking execution behavior together with the application calling flow. In either interface, assess configuration against actual results.
## Share an Agent service with API clients
After configuration in Console, an application can create a Session using that Agent's platform ID, and Service executes work according to the saved definition. Conversely, an authorized user can manage Agents created or updated through the management API in the same Namespace's Console. The shared resource ID connects the interfaces, and subsequent configuration changes are saved in the same Agent definition.
Under **Connections → Session API → Application credentials**, select an existing Application or create one for your business application, choose the required scopes, and select **Issue key**. The credential grants the current execution target and the selected calling operations. Your backend can use it to create Sessions, submit tasks, and retrieve results; it is distinct from a user identity used to configure platform resources. A new key is shown only at creation, so save it to your backend before leaving the page.
Expand **API example** for Session creation and Turn submission requests targeting the current resource. Reuse that target ID to integrate the Agent you verified in Console. Save the returned Session and Turn IDs and use those records when reading progress, responding to actions, or restoring your application's interface. See [Integrate applications with the Session API](/v2/en/service/service-api) for the calling flow and the [API reference](/v2/en/service/api-reference#agents) for Agent definition management.
To verify the application's identity before integration, enter its Application API key before creating a Session and submit a task. This checks whether the granted target and operations support the actual call. Use the relevant APIs for bulk management, automated integration, or parameters not yet exposed in the interface. Console remains available for managing related resources and inspecting their associated work.
## Assign, follow, and review work
Sessions support task submission and continuing interaction. When business work also needs an assignee, discussion, and acceptance, open **Work → Issues → New issue**, describe the objective, delivery requirements, and acceptance criteria, then assign an Agent, Team, or person. You can also use **Create issue** in Chat, but check and complete the carried-over material before submission. A conversation source reference does not give collaborators access to the entire private conversation.
Follow discussion and delivery in the Issue, and use associated **Executions** to inspect member tasks, steps, and failures. Add requirements through comments and Mentions, then check whether routed work progresses. Resolve missing conditions when work is `Blocked`; evaluate results against acceptance criteria when it reaches `In review`. A successful execution alone does not establish business completion.
Open **Review result** under **Work → Inbox → Needs action**, inspect results, attachments, and related child work, then select **Accept result** or **Request changes** and submit the review. Returning work records feedback, but subsequent execution still needs follow-up. Operation approval and result acceptance are separate decisions: allowing a tool or process step does not accept its final delivery. Handle Session tool actions in the corresponding Session; not every request appears in Inbox. See [Work, approvals, and acceptance](/v2/en/service/issues) for states and API operations.
 ## Configure Teams and Workflows
When one Agent cannot complete the objective independently, verify each member, then open **Design → Teams → New team** to select a Leader Agent and Additional members and define the shared delivery requirements. Describe delegation and review under **Advanced coordination instructions**, submit a Team task, and inspect actual assignments, member results, and Leader synthesis. Managed, External, and Hosted Agents can participate according to their capabilities. See [Create and run a Team](/v2/en/service/create-team) for membership and execution.
For fixed steps, open **Design → Workflows** and configure nodes, dependencies, and input mappings in **Workflow design**, then save the draft, validate it, and publish a revision. **Run Workflow** accepts input and associates an Issue; the Session API panel can also test a published revision. A started execution retains its revision, so later draft edits do not change it. See [Orchestrate a Workflow](/v2/en/service/workflows) for nodes and controls.
Teams and Workflows also support Session creation and result observation in their Session API panels, so application integration still uses Sessions and Turns. Each Turn starts a collaboration task or workflow execution rather than automatically retaining a Managed Agent's conversation context. See [Multi-agent orchestration overview](/v2/en/service/orchestration) to choose an approach.
## Schedules, events, and messaging
For recurring Agent or Team work, open **Work → Automations → New automation**, save the Runbook, assignee, and delivery requirements, and check the schedule, time zone, and Next runs. Save the rule disabled, inspect actual results with **Test run**, then enable it. For external events, add a Webhook trigger, configure accepted event types, and connect the sender using the provided URL and secret. Inspect Webhook deliveries and Runs separately for event receipt and execution. See [Schedules and event triggers](/v2/en/service/automation) for the rules.
For requests from existing messaging platforms, configure the platform connection, credentials, and routing under **Design → Channels**, and complete the external platform's callback or subscription setup. After the connection shows as running, send work from a test account and check receipt, target selection, and result delivery. Feishu currently supports linking messages to Issues and assigning Agents or Teams; check other adapters separately. See [Connect messaging channels](/v2/en/service/channels).
Rules and Channels configured in Console can also be managed through APIs. Choose the interface according to whether a person or a business system performs the operation. Automation and durable Channel work routing cannot currently target Workflows directly. Pausing a rule or closing the browser does not automatically cancel existing work; handle it through the relevant execution record.
This documentation is built and hosted on [Mintlify](https://mintlify.com), a developer documentation platform.
## Configure Teams and Workflows
When one Agent cannot complete the objective independently, verify each member, then open **Design → Teams → New team** to select a Leader Agent and Additional members and define the shared delivery requirements. Describe delegation and review under **Advanced coordination instructions**, submit a Team task, and inspect actual assignments, member results, and Leader synthesis. Managed, External, and Hosted Agents can participate according to their capabilities. See [Create and run a Team](/v2/en/service/create-team) for membership and execution.
For fixed steps, open **Design → Workflows** and configure nodes, dependencies, and input mappings in **Workflow design**, then save the draft, validate it, and publish a revision. **Run Workflow** accepts input and associates an Issue; the Session API panel can also test a published revision. A started execution retains its revision, so later draft edits do not change it. See [Orchestrate a Workflow](/v2/en/service/workflows) for nodes and controls.
Teams and Workflows also support Session creation and result observation in their Session API panels, so application integration still uses Sessions and Turns. Each Turn starts a collaboration task or workflow execution rather than automatically retaining a Managed Agent's conversation context. See [Multi-agent orchestration overview](/v2/en/service/orchestration) to choose an approach.
## Schedules, events, and messaging
For recurring Agent or Team work, open **Work → Automations → New automation**, save the Runbook, assignee, and delivery requirements, and check the schedule, time zone, and Next runs. Save the rule disabled, inspect actual results with **Test run**, then enable it. For external events, add a Webhook trigger, configure accepted event types, and connect the sender using the provided URL and secret. Inspect Webhook deliveries and Runs separately for event receipt and execution. See [Schedules and event triggers](/v2/en/service/automation) for the rules.
For requests from existing messaging platforms, configure the platform connection, credentials, and routing under **Design → Channels**, and complete the external platform's callback or subscription setup. After the connection shows as running, send work from a test account and check receipt, target selection, and result delivery. Feishu currently supports linking messages to Issues and assigning Agents or Teams; check other adapters separately. See [Connect messaging channels](/v2/en/service/channels).
Rules and Channels configured in Console can also be managed through APIs. Choose the interface according to whether a person or a business system performs the operation. Automation and durable Channel work routing cannot currently target Workflows directly. Pausing a rule or closing the browser does not automatically cancel existing work; handle it through the relevant execution record.
This documentation is built and hosted on [Mintlify](https://mintlify.com), a developer documentation platform.